Block 1 · 12:00–12:50 · Demonstration Design and Controlled Delivery
Demonstrations and the Individual
Portfolio
After completing this module, the student should be able to:
- plan and deliver a reliable end-to-end demonstration of an embedded Linux system;
- connect project evidence to requirements and course learning outcomes;
- distinguish shared team results from individually attributable competence;
- explain architectural decisions, alternatives, limitations, and failure behaviour;
- answer technical questions using evidence rather than unsupported claims;
- prepare a reproducible project archive without exposing credentials or personal data; and
- communicate technical work professionally to examiners, employers, clients, and engineering colleagues.
12.1 From a Working Prototype to Defensible Engineering
Building a prototype and demonstrating engineering competence are related but different activities.
A device may appear to work during a short presentation even though it has undocumented dependencies, unsafe default states, unreliable recovery, or code that only one team member understands. Conversely, a prototype may contain valuable engineering work even if one subsystem remains incomplete.
The purpose of the final demonstration and portfolio is therefore not to create a theatrical impression of perfection. The purpose is to make technically defensible claims and support them with evidence.
A defensible claim has four elements:
- Claim: a precise statement about the system or the student’s competence.
- Condition: the environment and assumptions under which the claim applies.
- Evidence: a test, measurement, code extract, log, diagram, or other attributable record.
- Limitation: what the evidence does not establish.
For example, the statement “our system is reliable” is too broad. A more defensible statement is:
During a controlled eight-hour network outage, the acquisition service continued recording locally at one sample every five seconds. All 5,760 expected records were stored, and the completed data file was uploaded after connectivity returned. This test demonstrates temporary network-outage tolerance, but it does not establish behaviour during storage failure or abrupt power loss.
The improved statement identifies the condition, metric, observed result, and boundary of the conclusion.
A good demonstration does not merely show that something happened. It connects an observed behaviour to a requirement and explains why the evidence is sufficient, what assumptions were made, and what remains uncertain.
12.2 The Role of the Team Project
The project is normally developed by a team of approximately three students. Teamwork is appropriate because realistic embedded systems cross several technical domains:
- Linux configuration and service management;
- sensors, actuators, GPIO, serial buses, and electrical interfaces;
- networking and distributed communication;
- MQTT, LoRa, LoRaWAN, ROS 2, HTTP, or other middleware;
- storage, visualization, and user interaction;
- deployment, security, testing, and documentation.
The team should operate as a small engineering group. Responsibilities may be divided, but the architecture must remain coherent. A sensor subsystem developed by one student, for example, cannot be integrated responsibly unless the other team members understand its interface, units, timing, errors, and failure behaviour.
The project creates the environment in which competence is exercised. It is not, by itself, proof that every team member possesses the same competence. One excellent programmer cannot carry the technical understanding of an entire group into three individual assessments.
12.2.1 Shared ownership and individual ownership
Every major result should have both a team context and attributable individual evidence. Table 12.1 illustrates the distinction.
| Project element | Shared team evidence | Possible individual evidence |
|---|---|---|
| System architecture | Agreed block diagram, interfaces, requirements, and integration plan | A student’s comparison of alternatives and justification for an owned subsystem |
| Sensor acquisition | Integrated measurements available to the complete system | Driver code, calibration experiment, sampling analysis, fault test, and commits attributable to one student |
| Communication | End-to-end data exchange between nodes | Topic design, protocol framing, QoS selection, payload validation, latency test, or reconnect implementation |
| Deployment | System starts and operates on the target hardware | systemd unit, container definition, installation script, permissions model, rollback procedure, and deployment test |
| Project element | Shared team evidence | Possible individual evidence |
|---|---|---|
| Security | Agreed trust boundaries and security controls | Threat analysis, MQTT access-control policy, credential handling, negative authentication test, or input-validation code |
| Verification | Team verification matrix and final test session | Tests designed, executed, interpreted, and documented by the individual |
| Documentation | Final report and common project archive | Named sections, technical diagrams, individual reflection, reviewed pull requests, and oral explanation |
Individual responsibility does not mean working alone. A student may design a component while another student reviews it. The important point is that the contribution, reasoning, and evidence can be identified.
12.3 Designing the Demonstration
A demonstration should be designed with the same discipline as a test. Randomly clicking through dashboards and terminal windows creates uncertainty and wastes time. The audience should know what the system is expected to do, which requirement is being demonstrated, and how success or failure will be recognized.
A useful sequence is:
- introduce the client, problem, and operating environment;
- present the main requirements and acceptance criteria;
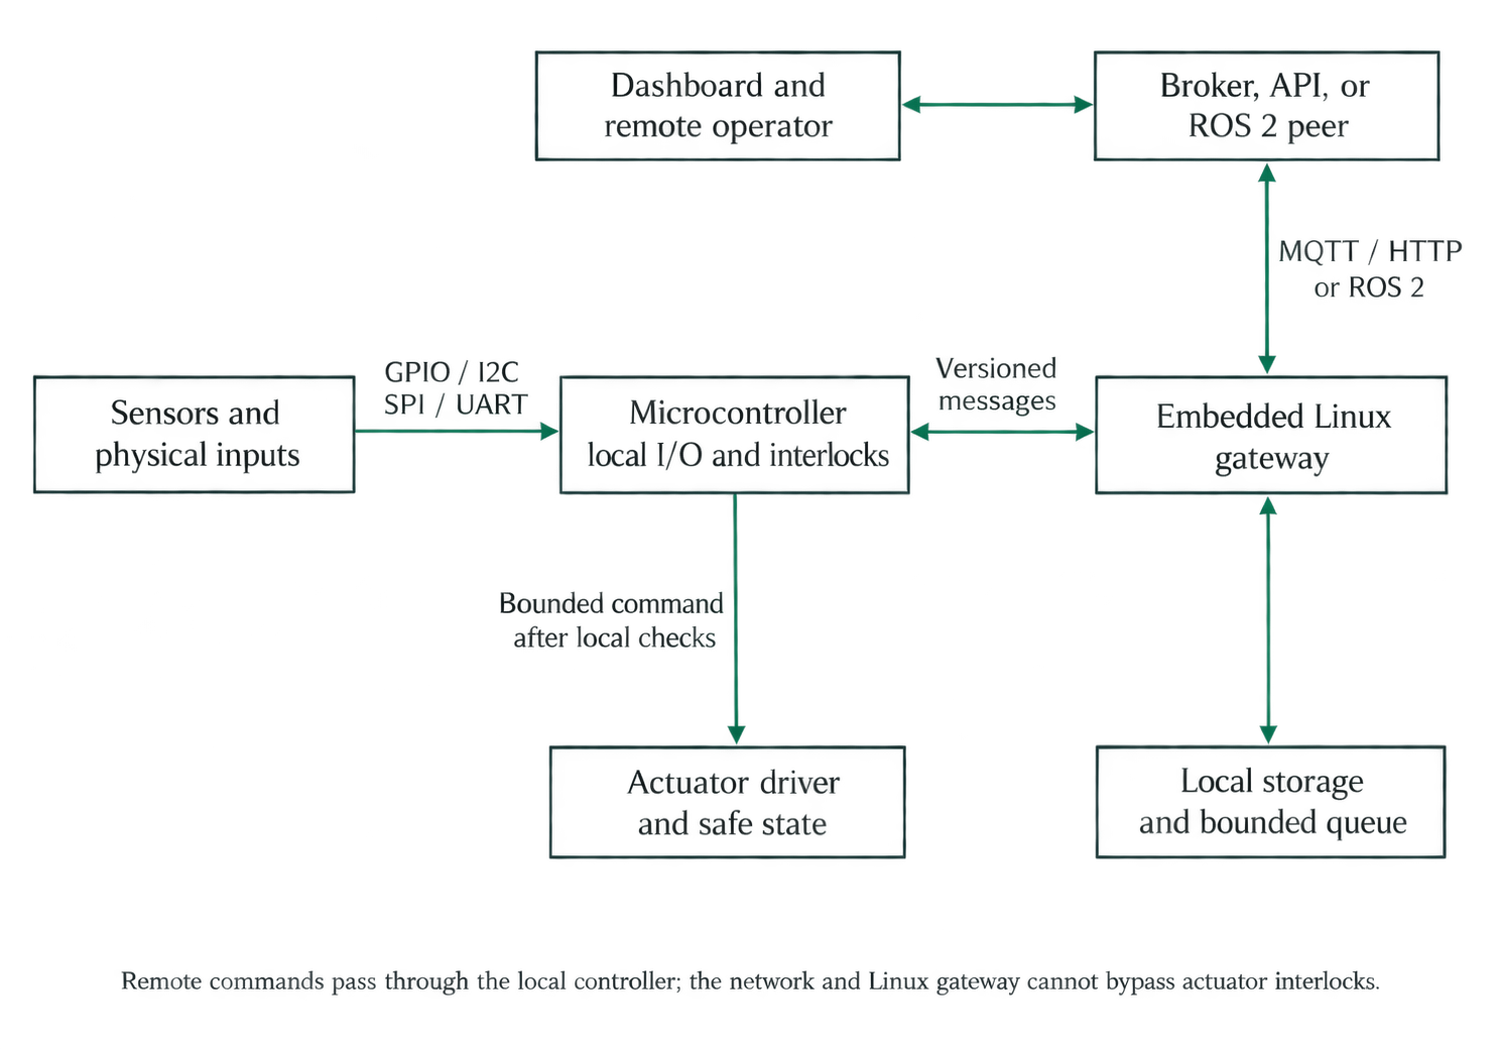
- show a block diagram of the complete system;
- identify the physical inputs, processing, communication, and outputs;
- demonstrate the minimum end-to-end function;
- show one important measurement or quality result;
- introduce a controlled fault when safe and practical;
- demonstrate detection, degraded operation, or recovery;
- summarize limitations and unfinished work; and
- identify where the supporting evidence is stored.
12.3.1 The minimum end-to-end path
The first live demonstration should show the shortest path through the complete system. For an environmental monitoring system, this might be:
physical quantity → sensor → embedded node → communication
→ Linux service → storage → user-visible result.
For a robotic system, the path might be:
operator goal → planning or control → command interface
→ actuator → physical motion → feedback.
The audience should see the complete path before optional features. A team that begins with secondary dashboards or configuration menus may never establish that the central function works.
12.3.2 A demonstration script
Table 12.2 gives an example for a 12-minute project demonstration. The actual duration must be adapted to the examination arrangements communicated by the course staff.
| Time | Stage | Action and explanation | Evidence |
|---|---|---|---|
| 0:00–1:00 | Problem | Identify the user, physical need, environment, and primary requirement | One problem statement and system photograph |
| 1:00–2:00 | Architecture | Explain the block diagram, trust boundaries, and principal interfaces | Numbered architecture diagram |
| 2:00–5:00 | Core function | Start the system and show the complete input-to-output path | Live values, timestamps, logs, or physical response |
| 5:00–7:00 | Measurement | Present one quantified result and compare it with its acceptance criterion | Graph, table, raw data, and calculation |
| 7:00–9:00 | Controlled fault | Disconnect a non-safety-critical dependency or inject invalid data | Health state, log event, safe response, and recovery |
| 9:00–10:30 | Engineering decision | Compare two realistic design alternatives and justify the selected one | Decision matrix or measured comparison |
| 10:30–12:00 | Limitations | State what worked, what failed, and the highest-priority improvement | Known-issues register and next-step plan |
The script should assign one person to operate the hardware, one to control the presentation, and one to monitor logs or safety. For an individual presentation, the student should still know exactly where each item is located and avoid searching through folders during the examination.
12.4 Demonstrating a Controlled Failure
A system that works only when every dependency is healthy is not necessarily a reliable embedded system. A controlled failure can reveal whether the team has considered detection, safe state, degraded operation, and recovery.
Possible demonstrations include:
- disconnecting a sensor and showing stale-data detection;
- providing an out-of-range or malformed measurement;
- temporarily blocking access to an MQTT broker;
- disconnecting a network interface while local acquisition continues;
- terminating an application and showing supervised restart;
- restarting services in an unexpected order;
- presenting invalid configuration and showing startup rejection;
- sending a duplicate sequence number and showing idempotent handling; or
- causing a command timeout and showing an actuator entering a safe state.
The team must not create an unsafe condition merely to make the demonstration interesting. Do not demonstrate uncontrolled motor movement, unsafe voltage, intentional battery abuse, damage to storage, unauthorized network access, radio interference, or bypassing a physical safety system.
A fault-injection demonstration must have a bounded consequence, a defined recovery procedure, and an immediately accessible safe stop. Safety-critical behaviour should be verified before the public demonstration, not improvised in front of an audience.
A good fault demonstration answers five questions:
- What exactly was changed?
- How did the system detect the fault?
- What state did the system enter?
- What evidence shows that recovery occurred?
- What would happen if recovery were impossible?
12.5 Preparing for Demonstration Day
Live demonstrations fail for ordinary reasons: a battery is empty, a cable is missing, a device receives a different IP address, credentials expire, a serial port changes name, a cloud service is unavailable, or an automatic update changes a dependency.
The team should rehearse using the actual target hardware, power supply, network, user accounts, software release, and presentation computer. A successful test on a developer’s laptop is not equivalent to a successful demonstration on the deployed target.
12.5.1 Technical readiness checklist
| No. | Check | Evidence or status |
|---|---|---|
| 1 | Release tag and source revision are recorded | Tag and commit hash |
| 2 | The target boots without a development laptop | Cold-boot test |
| 3 | Required services start automatically | systemctl evidence |
| 4 | Sensor and actuator connections are labeled | Wiring diagram and inspection |
| 5 | Batteries are charged and a compatible supply is available | Voltage and runtime check |
| 6 | Network-independent functionality has been tested | Offline test record |
| 7 | Credentials are valid but not visible in slides, code, or logs | Secret review |
| 8 | The demonstration account has only required permissions | Account and ACL check |
| 9 | A safe stop procedure is known to all team members | Rehearsed procedure |
| 10 | The controlled fault and recovery have been rehearsed | Fault-test record |
| 11 | Presentation files are available locally | Offline copy |
| 12 | Recorded evidence is available as a transparent fallback | Video, logs, and data |
| 13 | Adapters, cables, keyboard, mouse, and display interfaces are available | Equipment checklist |
| 14 | The demonstration has been completed within the available time | Timed rehearsal |
| No. | Check | Evidence or status |
|---|---|---|
| 15 | Temporary debugging bypasses have been removed | Release review |
12.5.2 The fallback package
A fallback package is not a substitute for attempting the live demonstration. It is evidence that permits technical discussion when an external dependency fails.
A useful fallback package contains:
- a short, unedited recording of the system operating;
- the software revision used in the recording;
- representative raw input and resulting output;
- relevant logs with synchronized timestamps;
- screenshots or exported plots;
- the test conditions and hardware configuration; and
- a statement of what the evidence proves and does not prove.
If the live demonstration fails, the student should state the observed symptom without inventing a diagnosis:
The gateway is not currently receiving the uplink. The device log shows that the local measurement and queue are operating, but we have not yet established whether the missing uplink is caused by the radio configuration, gateway availability, or network-server integration. I will use the recorded end-to-end test to explain the verified behaviour and then show how I would distinguish these hypotheses.
This response demonstrates more competence than blaming “the network” without evidence.